Tool Box
Hints, Tips and Stories from our Members
Home
Calendar
Gallery
About Us
West Lancs MG Owners Club
FIT A FILTER - article by Robert Collier
Many older MGs including MGBs left the factory without a fuel filter fitted as standard. If your car falls into this category it is wise to do some preventive maintenance and fit one as soon as possible. This is particularly so if your fuel tank is of some age as internal condensation causes rust to collect in the bottom of the tank. Your carburettors will be being fed by a supply of rust particles as well as petrol and debris will be collecting in the carburettor float chambers.
I recently fitted a fuel filter after debris had blocked a float chamber needle valve on my car (1964 MGB). This caused petrol to literally flood out of one of the carburettor overflow pipes leaving a trail of petrol down the road and a flood under the car when I stopped. Fortunately this happened near to home and I managed to drive home without bursting into flames!
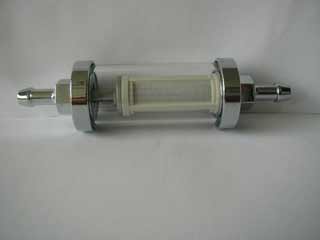
Plastic disposable fuel filters were standard on the later MGBs and can be bought for around £1.50 at autojumbles. These are not very attractive and don't exactly enhance the under bonnet look.  I bought a chrome and glass reusable filter at the Leighton Hall show for £6.50 ( a bargain as the Owners Club price is £15.85 for an identical filter!), which adds a bit more shine to the engine bay.
Fitting to the MGB is straight forward. It is a straight swap if you have a plastic one fitted or simply cut the petrol supply pipe on the bulkhead (near to the heater box ) and remove a piece of the supply pipe the length of the filter. Fix a couple of clips -( usually obtainable when you buy the filter) remembering to fit the filter the right way round (it is marked "in" and "out").
For good measure , I also cleaned out my float chambers at the same time, but before you do this it is advisable to buy new float chamber gaskets in case the old ones cannot be reused. Mine weren't serviceable and I had to trek to Moss in Manchester for replacements.
Photo above - Glass and chrome fuel filter adds that extra bit of shine to the engine bay. Fuel flow is from left to right in the picture.
SOLVING BRAKING PROBLEMS ON AN MGA

CARtoon by Stuart Cunningham
Solving Electrical problems

Two of our club members have had electrical problems recently. They are described below with the hope that they may be of some help if you suffer a similar problem.

1. Paul had an unusal problem with his MGB in that all the  lights were ON when driving - most electrical problems result in things not working. The main problem that Paul had with this is that both indicators flashed when turning instead of just one side - could be rather embarrassing - or dangerous. After spending some time looking for the problem , Paul took it to an experienced auto-electrician who soon found the fault. The wiring loom had rubbed against the gear box housing shorting out the wiring, so that all the circuits were interconnected. Paul was lucky in that a serious fire did not result from this. (When I took my car to Church Garage for its MOT last week, Neil spotted that some of  the wiring loom had lost its outer wrapping and this means that I will have to tape it up again or suffer the same fate as Paul - or worse. Do the same check next time you are underneath your car.)
2. Ray Travies was at the Tatton Park show with his GT  last week - (August 21st ) . When he came to start it up to leave the show , his engine would not fire . Many members gathered round with helpful advice ( or not so helpful such as - it needs a gallon of petrol --- and a match!!). We checked at the plugs and there was no spark - no spark at the points either but we reset the gap anyway as it was non-existent. No power was getting to 3 of the 4 fuses, but there was no sign of a wire disconnected or broken. Along came Darren, our professional mechanic - he did the same checks that we had done and then said that the problem must be at the ignition switch - sure enough , after crawling under the dash  he spotted a disconnected wire. Ray had knocked it loose when storing his  rucksack in the footwell - on reconnecting it  the car fired first time. Avoid this problem by putting a plastic tie around the wiring loom on the steering column - or store your rucksack somewhere else!
Email your photos and tips to Cam for publishing on this page.
QUICK SEAL EXPANDING ENGINE CORE PLUGS

I was at a local show recently when I met a fellow MGA owner named Keith (didn't get his surname.). He was not in his car but was on a caravan touring holiday staying at a site nearby. He had just finished restoring his car but had the misfortune to blow out the rear core plug on a recent run. He was asking if I knew whether this was an engine out job or not. I said that assumed it was as the core plug at the back of the engine is very inaccessible. It is bad enough to replace the ones at the side with the engine in place. I had one blow out on my GT a couple of years ago resulting in a transporter ride home. I found it almost impossible to get a good strike at the new core plug and ended up giving the job to the local garage at a cost of over £30. On further investigation on the internet I found out that there are easy fit core plugs for just such a problem and they were only available in USA. These plugs are just put into the core plug hole and the nut on the top is then tightened, which spreads the core plug so jamming it into postion. (see photos ) It is made mainly of copper so should be a semi permanent repair.The place that sells them, Rockauto, are a wholesale company so  would only sell in batches of 5 but they weren't too dear at less than $30 including p&p . I decided that I would get some so that I could carry a spare just in case mine blew a plug leaving me otherwise stranded. The plugs arrived within the week from Rockauto so I now had 4of them spare  , but managed to sell all of them to othere interested club members .
Core plug assembly
Core plug in bits - the nut and bolt compress the copper washers so that they spread out